
How to Expose Your Local Server to the Internet (Without Port Forwarding)
TL;DR:
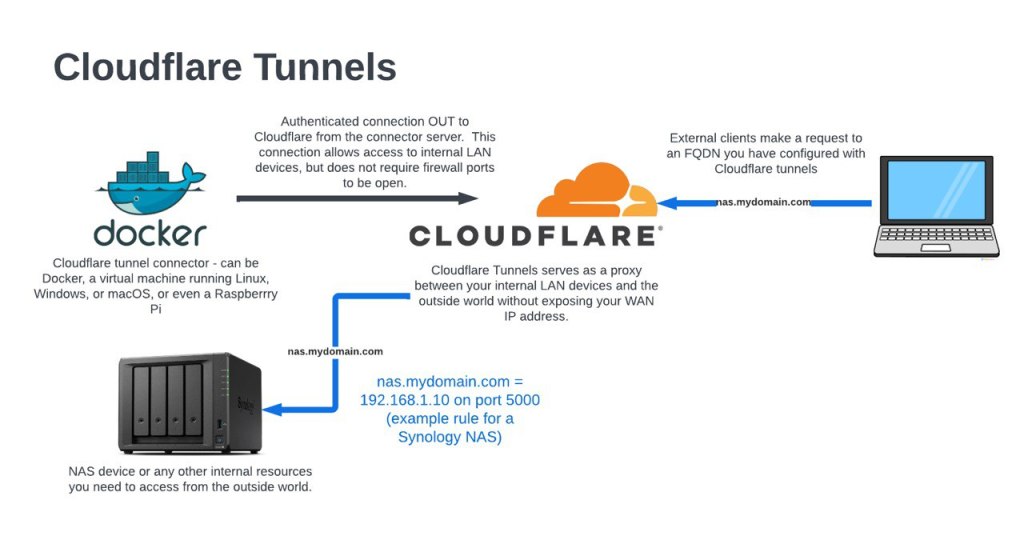
Use Cloudflare Tunnel to make your home server accessible from anywhere. Free, secure, no router configuration needed.
I recently deployed a web app running on my laptop to a real domain.
No cloud hosting, no VPS, no monthly bills.
Just my laptop, a domain, and Cloudflare Tunnel.
Here’s exactly how I did it.
THE PROBLEM
I wanted to host my side project on my own hardware. Sounds simple, right?
But my setup had a few issues:
- No access to the main router’s admin panel
- Dynamic IP address
- Port forwarding wasn’t an option
Traditional solutions like opening ports 80/443 weren’t going to work.
THE SOLUTION: CLOUDFLARE TUNNEL
Cloudflare Tunnel (formerly Argo Tunnel) creates an outbound connection from your server to Cloudflare’s edge.
No incoming ports needed.
Internet → Cloudflare (SSL) → Tunnel → Your laptop
It’s free and handles SSL automatically.
PREREQUISITES
- A domain name (any registrar works)
- A Cloudflare account (free tier is fine)
- A Linux, macOS, or Windows machine running your app
- ~10 minutes of time
STEP 1: ADD YOUR DOMAIN TO CLOUDFLARE
- Go to https://dash.cloudflare.com
- Click “Add a site”
- Enter your domain (e.g. myapp.com)
- Select the Free plan
- Cloudflare will show you new nameservers
STEP 2: UPDATE NAMESERVERS
Go to your domain registrar and replace the nameservers with Cloudflare’s.
Example (Porkbun):
- Domain Management → Your domain
- Nameservers → Edit
- Replace with Cloudflare nameservers
- Save and wait 5–30 minutes for propagation
STEP 3: CREATE A TUNNEL
- In Cloudflare, go to Zero Trust
- Navigate to Networks → Tunnels
- Click “Create a tunnel”
- Name it something like “my-server”
- Copy the installation command with the token
STEP 4: INSTALL CLOUDFLARED
Ubuntu / Debian:
<code>curl -L --output cloudflared.deb https://github.com/cloudflare/cloudflared/releases/latest/download/cloudflared-linux-amd64.deb<br>sudo dpkg -i cloudflared.deb</code>
macOS:
<code>brew install cloudflared</code>
Windows:
Download from https://github.com/cloudflare/cloudflared/releases
STEP 5: CONNECT THE TUNNEL
Run the command Cloudflare provided:
<code>sudo cloudflared service install</code>
Check status:
<code>sudo systemctl status cloudflared</code>
STEP 6: ADD A PUBLIC HOSTNAME
In Cloudflare dashboard:
- Open your tunnel → Configure
- Public Hostname → Add a public hostname
- Subdomain: leave empty (or use www)
- Domain: your domain
- Service Type: HTTP
- URL: localhost:80
- Save
TESTING
Open your domain in a browser or run:
<code>curl https://myapp.com</code>
SECURITY TIPS
- Use a firewall
- Do not expose admin panels
- Cloudflare provides SSL automatically
- Use Access Policies for sensitive routes
WHEN NOT TO USE THIS
- High-traffic production apps
- Apps requiring strict uptime
- Sensitive data without proper security
WRAPPING UP
Cloudflare Tunnel is ideal for side projects, development environments,
self-hosted apps, and personal APIs.
No cloud bills. No port forwarding. No DevOps headache.

Leave a comment